
Download the Exoprise Management Client
The Management Client is used for validating sensors during deployment and for guided installations of Private Sites.
- Once logged in, download and install the Exoprise Management Client from https://secure.exoprise.com/download
- Here is a link to the documentation for the Exoprise Management Client https://help.exoprise.com/kb/whats-the-management-client/
- Once installed, start the Exoprise Management Client and log in using your credentials
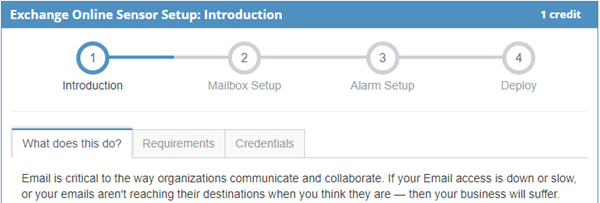
All sensor setups are wizard driven for ease of use and to ensure that sensors are correctly configured. Each sensor setup starts with an introduction that details the purpose, high-level actions, and metrics of a sensor. Often, sensors have specific requirements and recommendations. We recommend that customers read the requirements and recommendations of each sensor introduction before continuing with the sensor setup.
To begin deploying a sensor, you first need to select whether the sensor will be deployed to a Private Site (your machine, behind your firewall) or to a Public Site (our machines, out in the cloud). Setting up a sensor for a Private Site requires using the Exoprise Management Client for validation checking during sensor setup. Setting up a sensor for a Public Site can be done from any browser.
From the Add Sensor page, select the deployment type:
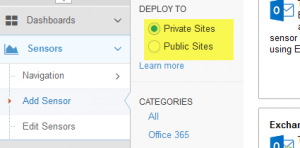
Some sensors cannot be run on public sites and the sensor list will be filtered when choosing public deployment. This is usually due to licensing restrictions.
Private & Public Site Sensor Deployment
Once you’ve selected private or public deployment, filter and choose the type of sensor that you would like to deploy. This will begin the sensor setup wizard.
Private Site

Public Site
Notice that there is no validation step present when deploying a public sensor from a regular browser. Additionally, some sensors run differently when deployed to a public site and have different configuration steps available.
Sensor Setup Steps
In the following section, we’ll cover some setup steps to explain what’s happening under the covers.
Introduction
High-level overview and some detail about what the sensor does. We recommend that customers read the requirements and recommendations tabs before proceeding.
Prerequisites
Different CloudReady synthetic sensors have different requirements and prerequisites. Some sensors are simple and some have more complicated requirements that must be checked prior to deployment. Many sensors require Microsoft .NET 4.5 or newer, private site sensor deployments require a private site to be installed, running and successfully connected to the Exoprise platform.
Credentials or Configuration Steps
Most sensors require different credentials or configuration to run. After the prerequisites are checked, there are usually separate steps for configuration. Some sensors require multiple configuration steps if the sensor performs different actions, or they are peer-to-peer. Please read each step carefully and follow the instructions of each page.
Validation
A key difference between private sensor setups and public sensor setups is the validation step. During setup, validation is performed on the machine where you are running the Management Client to validate that the credentials and configuration are correct prior to deploying to a site. You won’t be able to deploy to a site unless the validation is successful.
If validation is not successful, click ‘< Back’ to update the configuration and try again. Once validation is successful, you can proceed to the next step.
Alarm Setup
CloudReady synthetic sensors can automatically configure the most important default alarms for a sensor after the sensor is deployed and has run from some time. On this alarm setup page, configure alarm details such as:
- Setup Recommended Alarms
Configure how long to wait before we set up the default alarms for a sensor. The metrics that the sensor have collected are used in the determination of the alarm thresholds. If your network or the application that you are monitoring varies by time of day, then you can set the initial calibration period to be longer than the default of 4 hours. - Alarm Recipient Group
Choose or edit the recipient group for the alarm notifications to be sent to. You can add members or create new groups of emails or SMS-text messages for different sensors. - Disable Sensor After
If something happens with the configuration after deployment, the sensor may break and generate consecutive errors. We’ll disable the sensor after consecutive errors and no successful metrics, the sensor will be enabled 24 hours later as the condition may be transient. You can change this time period from the default of 6 hours.
Deploy
In the final deployment step you can configure how frequently you want to run the sensor, give the sensor a name, add notes about the sensor and choose the site to deploy to. If you choose multiple sites, the sensor configuration will be cloned. If you choose a site that is different from the site you are validating from, then the sensor may behave differently.
Choose from the list of available private or public sites and then click Finish to deploy the sensor.
Uninstall Sensor
Uninstalling a sensor is as simple as removing or deleting it. You can do so from the Edit Settings page for any specific sensor, or from the Edit Sensors page in bulk. Once a sensor is deleted, the site will get the commands that it should stop the sensor within a few minutes.
If a sensor required different prerequisites that were installed on the computer, those can be removed from the Control Panel.